
If you’re running an online store and wondering whether Performance Max campaigns are worth the hype, let me cut through the noise with some real talk. Performance Max has fundamentally changed how ecommerce brands advertise on Google, but it’s not the “set it and forget it” miracle solution that some marketers make it out to be.
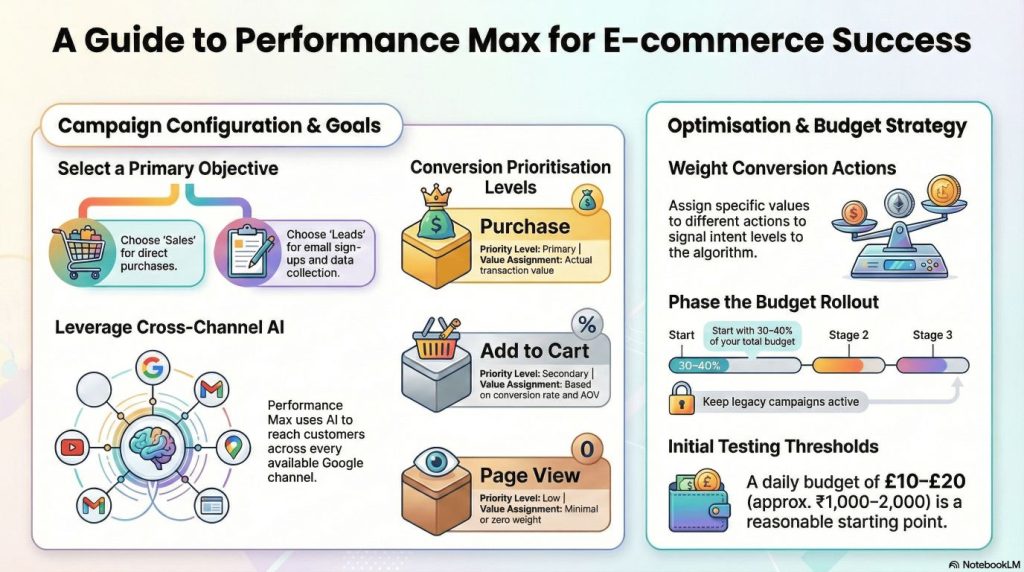
Here’s the reality: Performance Max campaigns combine multiple ad formats across Google’s entire advertising network—Search, Shopping, YouTube, Display, Discover, Gmail, and Maps—into a single automated campaign powered by Google’s AI. For ecommerce brands, this means your products can appear anywhere a potential customer is browsing, searching, or watching content across Google’s ecosystem.
The promise is compelling. Instead of managing separate Shopping campaigns, Display campaigns, and YouTube ads, you have one campaign that automatically optimizes budget and creative across all these channels based on what’s driving actual sales. The AI learns which combinations of channels, audiences, and creative assets generate the best return on ad spend and shifts budget accordingly.
But here’s what most guides won’t tell you: Performance Max can either be your most profitable campaign or your biggest budget drain. The difference comes down to how you set it up from day one. Without proper campaign structure, product feed optimization, and strategic audience signals, you’re essentially handing Google a blank check to spend wherever their algorithm decides, which often means dumping budget into low-converting Display placements.
This complete guide walks you through everything you need to know about Performance Max for ecommerce. You’ll learn the exact setup process that works for Indian online stores, how to optimize your product feed for maximum visibility, which bidding strategies actually deliver profitable growth, and how to scale campaigns without sacrificing return on investment. Whether you’re running a Shopify store, WooCommerce site, or custom ecommerce platform, these strategies apply.
Understanding Performance Max: What Makes It Different
Before diving into setup and optimization, you need to understand what Performance Max actually is and how it differs from traditional Google Shopping campaigns. This isn’t just another campaign type—it’s a fundamentally different approach to ecommerce advertising.
The Performance Max AI Engine
Traditional Google Shopping campaigns give you significant control. You create product groups, set bids for different categories or products, choose which search terms to target or exclude, and decide where your ads appear. You’re the strategist making decisions based on performance data.
Performance Max operates differently. The campaign uses Google’s AI to automatically determine where to show your ads, which audiences to target, how much to bid, and which creative combinations to use. You provide the inputs—your product feed, asset groups with images and text, audience signals, and conversion goals—and the AI optimizes everything else.
The technology behind Performance Max is sophisticated. It analyzes millions of signals in real-time: user search behavior, browsing history, video watching patterns, location, device, time of day, and countless other factors. It predicts which users are most likely to convert and automatically adjusts bids, placements, and creative to maximize conversions or conversion value within your target.
For ecommerce specifically, Performance Max connects directly to your Google Merchant Center feed, pulling product data, images, prices, and availability in real-time. When someone searches for “blue running shoes” or browses YouTube videos about fitness, the AI can instantly serve relevant product ads from your catalog without you having to manually set up campaigns for every product or keyword.
Performance Max vs Traditional Shopping Campaigns
The most common question ecommerce brands ask is whether to use Performance Max or stick with traditional Shopping campaigns. The answer isn’t one-size-fits-all.
Traditional Shopping campaigns excel at transparency and control. You can see exactly which search terms trigger your ads, which products are performing well, what customers are searching for, and you can make granular adjustments to bids and targeting. You structure product groups by category, brand, custom labels, or individual products. You add negative keywords to prevent appearing for irrelevant searches. You control exactly where your budget goes.
Performance Max campaigns excel at scale and automation. The AI can find converting customers across channels you might not have considered or don’t have time to manage individually. It automatically tests different creative combinations to find what resonates with each audience segment. It shifts budget dynamically toward whatever’s working best at any given moment. For busy ecommerce teams, this automation is valuable.
| Feature | Traditional Shopping | Performance Max |
|---|---|---|
| Search term visibility | Full transparency | Limited insights |
| Bid control | Manual or automated per product group | AI-driven across all channels |
| Negative keywords | Yes, extensive control | Limited (campaign-level only) |
| Channel coverage | Shopping network only | All Google properties |
| Creative flexibility | Product feed only | Feed + custom assets |
| Best for | Control & optimization | Scale & automation |
The strategic approach many successful ecommerce brands use is running both simultaneously. Use traditional Shopping campaigns for your best-selling products or high-margin items where you want maximum control. Use Performance Max for broader catalog coverage and to find new converting audiences across channels. Just make sure to add campaign name exclusions so they don’t compete against each other for the same placements.
What You Need Before Starting
Performance Max isn’t for complete beginners. You need foundational elements in place before launching campaigns, or you’ll waste budget during an extended learning phase.
Google Merchant Center must be fully set up and approved. Your product feed should be running without policy violations, disapprovals, or pending reviews. Performance Max pulls directly from Merchant Center, so any feed issues immediately impact campaign performance. If you’re still fixing “missing GTIN” errors or struggling with product disapprovals, solve those first.
Conversion tracking must be accurate and complete. Performance Max optimizes toward your conversion goals, so if tracking is broken or inaccurate, the AI optimizes toward the wrong thing. Set up enhanced conversions for better accuracy. Make sure you’re tracking not just purchases but also add-to-carts and other micro-conversions that inform the algorithm. Test your tracking thoroughly before spending significant budget.
You need sufficient conversion volume. Google recommends at least 30-50 conversions per month for Performance Max to optimize effectively. If your store generates fewer conversions, the algorithm struggles to find patterns and may spend erratically. In this case, start with traditional Shopping campaigns until you build conversion volume, then transition to Performance Max.
Budget expectations matter. Performance Max needs adequate budget to test different channels, audiences, and creative combinations during the learning phase. Plan for a minimum of ₹30,000-50,000 monthly budget for Indian ecommerce stores. Smaller budgets can work but expect longer learning periods and more limited reach.
Setting Up Your First Performance Max Campaign
Now let’s walk through the actual campaign creation process step by step. I’ll explain not just what to do but why each decision matters for ecommerce performance.
Campaign Goal and Conversion Actions
Start by creating a new campaign in Google Ads. Select “Sales” as your campaign goal if you’re focused on driving purchases (which most ecommerce brands are). Alternatively, select “Leads” if you’re primarily collecting email sign-ups or other lead actions rather than immediate purchases.
Choose “Performance Max” as your campaign type. You’ll see Google’s description emphasizing that this campaign will show across all Google channels using AI optimization.
Setting your conversion actions correctly is crucial. Click on “Conversion goals” and review what you’re optimizing toward. For ecommerce, your primary conversion should be “Purchase” or “Transaction.” However, you can also include secondary conversions like “Add to Cart” or “Begin Checkout” to give the algorithm more data points, especially in the early learning phase.
Here’s where many ecommerce stores make a mistake: they give equal weight to all conversions. A page view, an add-to-cart, and a purchase all signal different levels of intent and value. Configure your conversion actions with appropriate values. Your purchase conversion should have the actual transaction value. Your add-to-cart might have a value based on your add-to-cart to purchase conversion rate multiplied by average order value.
Set a realistic campaign budget. Don’t start with your entire advertising budget in one Performance Max campaign. Begin with 30-40% of your budget, keep your Shopping campaigns running, and gradually shift more budget to Performance Max as it proves performance. For Indian ecommerce brands, starting with ₹1,000-2,000 daily budget is reasonable for testing.
Choosing Your Bidding Strategy
Performance Max offers three main bidding strategies, each suited to different business objectives and maturity levels.
Maximize Conversions tells the algorithm to get as many conversions as possible within your budget, regardless of cost. This strategy works well when you’re starting out and don’t yet know your target cost per acquisition. The algorithm will spend your full budget and deliver whatever conversions it can find. Use this for the first 2-4 weeks to gather data about your actual conversion costs across different channels and audiences.
Maximize Conversion Value optimizes for total conversion value rather than just number of conversions. If you’re passing transaction values back to Google Ads (which you should be for ecommerce), this strategy prioritizes higher-value purchases. Someone buying a ₹5,000 product gets prioritized over someone buying a ₹500 product. Use this when you want to maximize revenue, not just order count.
Target ROAS (Return on Ad Spend) is the most sophisticated strategy. You tell Google Ads your target return—for example, 400% ROAS means you want ₹4 in revenue for every ₹1 spent on ads. The algorithm then adjusts bids to try to achieve that target. This gives you more control over profitability but requires having enough conversion data for the AI to work with.
For most ecommerce stores, here’s the progression I recommend:
Weeks 1-2: Use Maximize Conversions to gather data
Weeks 3-4: Switch to Maximize Conversion Value once you have 30+ conversions
Week 5+: Implement Target ROAS based on your actual performance data
When setting Target ROAS, start conservative. If your data shows you’re achieving 300% ROAS, set your target at 250% initially. This gives the algorithm room to spend and learn. You can gradually increase your target as performance stabilizes.
Campaign Settings That Matter
Several campaign-level settings significantly impact performance but are often overlooked.
Location targeting should match where you actually ship products and where you want to spend advertising budget. For Indian ecommerce brands shipping nationwide, select India as your location. However, if you only ship to certain states or cities, restrict your targeting accordingly. There’s no point paying for clicks from customers you can’t serve.
Within location settings, choose “Presence: People in or regularly in your targeted locations” rather than “Presence or interest.” The latter shows ads to anyone interested in your location even if they’re not physically there, which creates irrelevant clicks for local ecommerce businesses.
Language targeting should include all languages your product feed and website support. Most Indian ecommerce stores should target both English and Hindi at minimum. If your site supports regional languages like Tamil, Telugu, or Marathi, add those too. The AI will automatically show ads in appropriate languages based on user preferences.
Final URL expansion is a setting that allows Google to send users to different pages on your website beyond the URLs in your product feed if the AI predicts better conversion rates. For ecommerce, I generally recommend keeping this enabled initially. Google might send someone searching for “running shoes” to your running shoes category page rather than a specific product if historical data suggests the category page converts better. Monitor this in your analytics and disable if you see traffic going to irrelevant pages.
Connecting Your Product Feed
This is where Performance Max becomes specifically powerful for ecommerce—the direct integration with your Google Merchant Center product feed.
Click “Add products” and you’ll see options to use products from Google Merchant Center. Select your Merchant Center account, and you can choose which products to include in this campaign.
You have several options for product selection:
Use all products: The campaign will advertise your entire catalog automatically. New products you add to Merchant Center will automatically be included. This works well for stores with consistent quality across the catalog.
Select specific products: You can filter by brand, category, product type, custom labels, or other attributes. This is useful when you want separate campaigns for different product lines or when certain products have different margin structures requiring different ROAS targets.
Exclude certain products: Even if you’re using all products, you can exclude specific items. This is helpful for excluding out-of-stock items, products with quality issues, or extremely low-margin items where advertising doesn’t make economic sense.
For your first Performance Max campaign, I recommend starting with your best-selling products or highest-margin categories rather than your entire catalog. This focuses the AI’s learning on products you most want to sell. As the campaign proves performance, you can expand to include more products.
Custom labels become extremely valuable in Performance Max. In your Merchant Center feed, you can add custom labels (custom_label_0 through custom_label_4) to tag products with characteristics like margin level, seasonality, bestseller status, or promotional products. You can then create separate Performance Max campaigns for high-margin products versus low-margin products, each with appropriate ROAS targets.
Example custom label structure:
- custom_label_0: Margin (High/Medium/Low)
- custom_label_1: Seasonality (All-Season/Summer/Winter/Festive)
- custom_label_2: Product maturity (New/Established/Clearance)
- custom_label_3: Price tier (Budget/Mid/Premium)
- custom_label_4: Stock level (In-Stock/Low-Stock/Backorder)
This allows you to create campaigns like “Performance Max – High Margin All-Season Products” with an aggressive ROAS target, separate from “Performance Max – Clearance Products” optimized for volume over margin.
Creating Effective Asset Groups
Asset groups are Performance Max’s version of ad creative. They combine headlines, descriptions, images, logos, and videos that the AI mixes and matches to create ads across different Google properties.
Think of asset groups as your creative themes. For an online fashion store, you might have one asset group focused on formal wear with professional imagery and sophisticated copy, and another for casual wear with lifestyle imagery and relaxed copy. The AI will automatically show the appropriate creative to each audience segment.
Each asset group requires minimum assets:
- 3-5 headlines (max 30 characters each)
- 1-5 long headlines (max 90 characters)
- 2-5 descriptions (max 60 characters each)
- 1-5 longer descriptions (max 90 characters)
- Up to 20 images (landscape, square, portrait)
- 1-5 logos
- 1-5 videos (optional but recommended)
Headlines for ecommerce should focus on benefits, offers, and trust signals:
Good examples:
- “Free Shipping Across India” (30 chars)
- “Premium Quality | Fast Delivery” (31 chars – just slightly over but works)
- “Shop Latest Fashion Trends” (27 chars)
- “Save Up to 50% Today” (20 chars)
- “Trusted by 50,000+ Customers” (29 chars)
Bad examples:
- “Welcome to Our Store” (generic, no value)
- “Products for Sale” (obvious, wasteful)
- “Buy Now Click Here” (pushy, low quality)
Descriptions should provide specific value propositions:
Good examples:
- “Discover premium quality products with fast delivery to your doorstep.”
- “Shop with confidence. Easy returns, secure payments, 24/7 support.”
- “Trendy styles at unbeatable prices. New arrivals added weekly.”
Images are critical for ecommerce Performance Max. The AI uses your product images from Merchant Center automatically, but additional lifestyle images, category images, and brand imagery help performance across Display and YouTube placements.
Image requirements:
- Landscape: 1200×628 pixels minimum (1.91:1 ratio)
- Square: 1200×1200 pixels minimum (1:1 ratio)
- Portrait: 960×1200 pixels minimum (4:5 ratio)
Provide the maximum number of high-quality images across all three formats. Include:
- Hero product shots on white background
- Lifestyle images showing products in use
- Category-level images if you sell multiple product types
- Brand identity images showing your store personality
Videos significantly boost Performance Max performance on YouTube and Discover placements. You don’t need expensive production—even simple product demonstration videos or customer testimonial compilations work well. Videos should be:
- 10-30 seconds for maximum engagement
- Mobile-optimized (vertical or square works well)
- Front-load the key message (first 3 seconds matter most)
- Include text overlays (many people watch without sound)
If you don’t have videos yet, start with creating 2-3 simple videos using free tools like Canva or InVideo. As performance proves out, invest in better video production.
Setting Up Audience Signals
Audience signals are one of the most misunderstood features of Performance Max. They’re not targeting restrictions—they’re hints that help the AI learn faster.
The algorithm isn’t limited to these audiences. If it finds converting customers outside your signals, it will pursue them. Think of audience signals as a starting point for the learning process, not a fence around your targeting.
Custom segments let you define audiences based on specific characteristics:
- Interests: People interested in fashion, electronics, sports, etc.
- Search terms: People who have searched for specific keywords on Google
- URLs they’ve visited: People who browse websites related to your products
- Apps they use: People who have specific apps installed
For an ecommerce fashion store, custom segments might include:
- People interested in fashion and apparel
- People who have searched for “buy ethnic wear online”
- People who browse competitor websites
- People who use shopping apps
Your data segments are even more powerful:
- Website visitors: People who visited your store but didn’t purchase
- Past purchasers: Your existing customers (useful for cross-selling)
- Cart abandoners: People who added products but didn’t complete checkout
Upload these audience lists from your website analytics or CRM. The AI uses them to find “lookalike” audiences—people who behave similarly to your best customers but haven’t discovered your store yet.
Demographics provide basic signals:
- Age ranges most likely to buy your products
- Household income levels (if relevant)
- Parental status (if you sell baby/family products)
Don’t over-restrict demographics. If you’re unsure, leave them broad and let the AI find patterns in the data.
Important: Add multiple audience signals but don’t overthink it. The algorithm will explore beyond your signals if performance data suggests opportunity elsewhere. Three to five well-chosen audience signals are sufficient for most campaigns.
Product Feed Optimization: The Foundation of Performance
Your product feed is the foundation of Performance Max for ecommerce. No amount of smart bidding or great creative can overcome a poorly optimized feed. Let me show you exactly how to structure your feed for maximum performance.
Product Title Optimization Strategy
Product titles are the single most important feed attribute for Performance Max. They directly impact whether your ads show for relevant searches and whether customers click when they see your products.
Google uses your product titles to match products to search queries, especially on Shopping placements. A well-optimized title includes the key attributes customers search for in the order of importance.
Effective title structure for most products: [Brand] [Product Type] [Key Attributes] [Size/Color/Variant]
Examples of strong product titles:
- “Nike Air Zoom Pegasus 39 Running Shoes – Men’s – Black – Size 10”
- “Samsung 55-Inch 4K Smart LED TV – Crystal UHD – 2023 Model”
- “Levi’s 511 Slim Fit Jeans – Mens – Dark Blue – 32×32”
Examples of weak product titles:
- “Shoes” (too vague, no detail)
- “Nike Shoes Black Color Available in All Sizes” (keyword stuffing)
- “Check out our amazing running shoes for men” (promotional language)
Key principles:
Front-load the most important information. People scan quickly, so put brand and product type first. If someone searches “Nike running shoes,” your title should start with “Nike” and include “Running Shoes” early.
Include specific attributes that matter for your category. For fashion: brand, product type, style, gender, color, size. For electronics: brand, product type, key specs (screen size, storage), model number. For home goods: brand, product type, material, dimensions, color.
Use natural language, not keyword stuffing. “Nike Running Shoes Men Black Size 10” is better than “Nike Shoes Running Sports Athletic Men Black 10.” The first reads naturally and contains the same information.
Keep titles under 150 characters. Google truncates longer titles, and you want your key information visible. Most important attributes should be in the first 70-80 characters since that’s what typically displays.
For Indian ecommerce specifically, consider including relevant local attributes:
- “Cotton” vs “Polyester” (material matters for Indian climate)
- “Free Shipping” (if applicable and competitive differentiator)
- “Indian Wear” or “Western Wear” (category distinction)
- Regional sizing if applicable (S/M/L vs. specific Indian size standards)
Image Quality and Requirements
Product images directly impact Performance Max click-through rates and conversions across all placements. The AI heavily weights image performance when deciding which products to promote.
Minimum technical requirements:
- Format: JPG, PNG, GIF, or BMP
- Size: Minimum 100×100 pixels, recommended 800×800 pixels or larger
- File size: Under 16MB
- No promotional text or watermarks on the main image
Quality standards that actually matter:
Use high-resolution images that remain crisp when zoomed. Customers can’t touch products online, so they scrutinize images carefully. Blurry or pixelated images kill conversion rates.
White or neutral background for main product image. This is especially important for Shopping placements where products appear alongside competitors. A clean background makes your product stand out and looks more professional.
Show products from multiple angles using the additional_image_link attribute. Front view, back view, side view, detail shots of important features. Fashion items should include fit photos showing how products look when worn.
Maintain consistent style across your catalog. If some products have white backgrounds and others have lifestyle backgrounds, your brand looks inconsistent and less trustworthy.
For Indian ecommerce, pay special attention to mobile image optimization. Over 80% of Indian ecommerce traffic comes from mobile devices, where screen real estate is limited. Images must be clear and impactful even at small sizes.
Price and Availability Optimization
Pricing directly impacts Performance Max ad rank and competitiveness. The algorithm considers price in its predictions of conversion likelihood.
Price competitiveness matters. If your prices are significantly higher than competitors for identical products, you’ll struggle to win auctions even with higher bids. Use the price benchmarks report in Merchant Center to understand where your pricing stands.
However, being the cheapest isn’t necessary for success. Customers value other factors like fast shipping, easy returns, brand trust, and product quality. If you provide superior value beyond price, communicate that in your asset groups.
Sale pricing should be handled correctly. Use the sale_price attribute for products with temporary discounts. This displays the original price struck through with the sale price, creating urgency and improving click-through rates.
Make sure sale_price_effective_date is accurate. If your sale ends but the sale price remains in the feed, you risk showing incorrect pricing to customers, which damages trust and violates Google policies.
Availability must be accurate in real-time. Nothing frustrates customers more than clicking an ad for a product, only to find it’s out of stock. Use the availability attribute correctly:
- “in_stock” for products ready to ship
- “out_of_stock” for products currently unavailable
- “preorder” for products available for pre-order
- “backorder” for products that can be ordered but will ship later
Ideally, implement automatic feed updates whenever inventory changes. Many ecommerce platforms offer plugins or integrations that sync inventory to Google Merchant Center in real-time or every few hours.
Leveraging Custom Labels for Campaign Segmentation
Custom labels are the secret weapon for sophisticated Performance Max ecommerce strategies. These attributes don’t show to customers—they’re purely for your campaign management use.
Best practices for custom label structure:
custom_label_0 – Margin Tier:
- High (>40% margin)
- Medium (20-40% margin)
- Low (<20% margin)
This allows separate campaigns optimizing for different profitability levels. High-margin products can support higher CPAs and aggressive ROAS targets.
custom_label_1 – Seasonality:
- All-Season
- Summer
- Winter
- Monsoon
- Festival (Diwali, Holi, etc.)
Seasonal segmentation lets you adjust budgets and bids based on current demand. Heavily promote festival products in October-November, monsoon wear in July-September, etc.
custom_label_2 – Product Performance:
- Bestseller
- New Launch
- Slow Mover
- Clearance
Bestsellers might deserve separate campaigns with higher budgets since they have proven demand. New launches need different strategies focused on building initial reviews and traction.
custom_label_3 – Price Tier:
- Budget (<₹1,000)
- Mid-Range (₹1,000-5,000)
- Premium (>₹5,000)
Different price points attract different customers with different purchase behaviors. Segmenting by price tier helps optimize messaging and ROAS targets appropriately.
custom_label_4 – Stock Level:
- Abundant
- Normal
- Low-Stock
This prevents aggressive promotion of products about to run out while allowing you to push products with excess inventory.
Implementing custom labels requires updating your product feed, but most ecommerce platforms support this through feed rules or app integrations. The strategic flexibility you gain is worth the setup effort.
Advanced Optimization Strategies
Once your campaigns are running, optimization separates profitable Performance Max campaigns from budget-draining ones. These advanced strategies help you continually improve performance.
Asset Group Testing and Refresh Strategy
The AI tests different combinations of your headlines, descriptions, and images to find what works best for each audience and placement. But you still need to actively manage and refresh your creative.
Monitor asset performance weekly. In your Performance Max campaign, click into your asset group and view the “Assets” tab. Google shows performance ratings for each asset: Low, Good, or Best.
Replace “Low” performing assets every 2-3 weeks. If a headline consistently rates Low, it’s dragging down performance. Replace it with new copy testing a different angle or value proposition.
Keep “Best” performing assets but create variations. If “Free Shipping Across India” is your best-performing headline, test variations like “Fast & Free Delivery” or “Free Shipping on All Orders” to find even better performers.
Asset refresh schedule:
- Week 1-2: Let assets run without changes (learning phase)
- Week 3-4: Replace bottom 20% of assets based on performance
- Month 2+: Monthly refresh of lowest performers, quarterly refresh of all assets
Even good assets can suffer from ad fatigue over time. Customers who see the same creative repeatedly become blind to it. Quarterly creative refreshes keep campaigns performing well.
Budget Scaling Without Sacrificing ROAS
The most common question after achieving good Performance Max results is “how do I scale?” Increasing budget without destroying your return on ad spend requires discipline.
The 20% rule: When scaling budget, increase by no more than 20% per week. If you’re spending ₹50,000 weekly with good ROAS, increase to ₹60,000 the next week, not ₹1,00,000. Sudden large budget increases force the algorithm to spend in less optimal placements, degrading performance.
Monitor Target ROAS as you scale. If you’re hitting your target ROAS consistently, you can gradually lower the target to allow more spend. For example, if you’re targeting 400% ROAS and consistently achieving 450-500%, lower your target to 350% to unlock more volume while still maintaining profitability.
Watch for diminishing returns. Most campaigns have a point where additional budget doesn’t produce proportional results. If doubling your budget only increases conversions by 30%, you’ve hit that point. Scale back to the previous budget level or segment your campaigns differently.
Use the Recommendations tab intelligently. Google provides budget recommendations showing how much more you could spend based on current performance. Take these with caution—Google benefits from you spending more, so recommendations tend to be aggressive. Use them as a data point, not gospel.
Dealing with Display Placement Issues
One common Performance Max challenge for ecommerce is excessive budget flowing to Display placements with poor return. The AI sometimes discovers Display traffic converts cheaply, then overspends there at the expense of higher-quality Shopping and Search placements.
Monitor placement performance in your campaign’s “Insights” section. While Performance Max doesn’t show granular placement data like traditional campaigns, the Insights tab provides high-level visibility into where your ads appear and how each channel performs.
If you notice Display accounting for 60-80% of impressions but contributing only 20-30% of conversions, you may have a balance issue. Some strategies to address this:
Adjust your asset groups to be less Display-friendly. Display placements love image-heavy assets. If you provide 20 stunning images, the AI will leverage them heavily on Display. Reducing to 8-10 images and focusing more on product feed quality can shift more budget to Shopping.
Exclude specific placements showing zero conversions. In campaign settings, you can add “Content exclusions” to avoid certain types of Display inventory like parked domains or error pages that sometimes generate clicks but rarely convert.
Create a separate Display campaign alongside Performance Max. Run a dedicated Display campaign with very conservative targeting and budgets. This satisfies the AI’s desire for some Display presence while keeping your main Performance Max budget flowing to better channels.
Remember, some Display spend is normal and valuable—YouTube and Gmail placements often perform well for ecommerce. The goal isn’t eliminating Display but ensuring budget allocation aligns with actual business results.
Performance Max for Different Ecommerce Platforms
Implementation details vary slightly depending on your ecommerce platform. Here’s what you need to know for the most common platforms in India.
Shopify Integration
Shopify makes Performance Max setup relatively straightforward with the Google & YouTube app integration. Install the app from the Shopify App Store, connect your Google Ads account, and sync your product catalog to Google Merchant Center automatically.
Key Shopify-specific tips:
Use Shopify’s automatic feed updates. The integration syncs product changes, inventory levels, and pricing to Merchant Center multiple times daily, keeping your ads current.
Leverage Shopify’s built-in conversion tracking. The Google app installs tracking code automatically. Just verify in your Google Ads account that conversions are recording properly.
Use Shopify collections to create custom labels. You can map Shopify collections to custom labels in your feed, allowing campaign segmentation based on how you’ve already organized your products.
Common Shopify mistakes to avoid:
Don’t rely solely on the automated feed. Review and optimize product titles, descriptions, and images even though they sync automatically. Shopify’s default product titles often need enhancement for optimal Google Ads performance.
Set up Enhanced Conversions through Google Tag Manager if you want more accurate tracking. The basic Shopify integration is good, but Enhanced Conversions provide better data for the AI to optimize.
WooCommerce Setup
WooCommerce requires slightly more manual setup but offers more flexibility. Use a feed management plugin like “Product Feed PRO for WooCommerce” or “WooCommerce Google Feed” to create and manage your Merchant Center feed.
WooCommerce-specific recommendations:
Configure feed rules in your plugin to optimize product titles. Most plugins let you create formulas combining different product attributes to generate ideal titles.
Use the custom field functionality to add custom labels. Create custom fields for margin tier, seasonality, or any other segmentation attributes, then map them to custom labels in your feed.
Set up automatic feed refresh. Configure your plugin to regenerate and upload the feed to Merchant Center every few hours to keep inventory and pricing current.
WooCommerce conversion tracking requires installing the Google Ads conversion tag manually or through Google Tag Manager. Use the WooCommerce purchase confirmation as your trigger. Enhanced Conversions requires additional setup passing hashed user email data.
Custom Platform Considerations
If you’re running a custom-built ecommerce platform, you’ll need to handle feed generation and maintenance programmatically.
Generate XML or TXT feeds that comply with Google’s product feed specifications. Schedule automated feed generation and upload to Google Merchant Center via their Content API.
Implement proper conversion tracking using Google Ads conversion tracking code on your order confirmation page. Pass transaction value and order ID for accurate revenue tracking.
Custom platforms offer maximum flexibility for feed optimization. You can create custom logic for product titles, implement sophisticated custom label strategies, and sync real-time inventory without plugin limitations.
Measuring Success: What Actually Matters
Performance Max provides plenty of metrics, but knowing which ones actually indicate business success is crucial for optimization decisions.
Key Performance Indicators for Ecommerce
Return on Ad Spend (ROAS) is the primary metric for most ecommerce businesses. It measures revenue generated per rupee spent on advertising. Calculate ROAS as: (Total Revenue / Total Ad Spend) × 100%.
A 400% ROAS means you generate ₹4 in revenue for every ₹1 in ad spend. Whether this is good depends on your margin structure. If you have 40% margins, 400% ROAS means you’re roughly breaking even. You need 600-800% ROAS to be truly profitable.
Cost per Acquisition (CPA) measures how much you spend to acquire one customer. For ecommerce, this is your total ad spend divided by number of orders. CPA should be well below your average order value for profitability.
Conversion Rate shows what percentage of clicks result in purchases. If 100 people click your ads and 3 make purchases, your conversion rate is 3%. For ecommerce Performance Max, good conversion rates vary by industry but typically range from 2-5%.
Average Order Value (AOV) tracks the average purchase amount. Performance Max can optimize for higher AOV when using Maximize Conversion Value bidding, which is valuable for improving overall profitability.
New Customer Rate shows what percentage of conversions come from first-time buyers versus repeat customers. Performance Max now offers new customer acquisition goals that specifically optimize for bringing new buyers rather than just selling to existing customers repeatedly.
Reporting and Analytics Setup
Connect Google Analytics 4 to your Google Ads account for deeper insights. While Performance Max doesn’t show all the granular data you’d get from traditional Shopping campaigns, GA4 reveals customer behavior after they click your ads.
In GA4, create custom explorations to analyze:
- Which landing pages convert best from Performance Max traffic
- Average session duration and engagement from PMax versus other channels
- Cart abandonment rates for PMax traffic
- Customer lifetime value from PMax acquired customers
Set up conversion tracking in GA4 that mirrors your Google Ads conversions. This allows cross-verification that your tracking is accurate and provides backup data if Google Ads tracking ever has issues.
Create a weekly reporting dashboard tracking:
- Total spend and spend trend
- Total revenue and revenue trend
- ROAS (current vs. target)
- CPA (current vs. target)
- Conversion rate
- Impression share
- Number of conversions by channel (Shopping, Search, Display, YouTube)
Review this dashboard every Monday to catch any performance changes early and make timely optimizations.
Common Mistakes and How to Avoid Them
After working with dozens of ecommerce brands on Performance Max, I’ve seen the same mistakes repeatedly. Here’s how to avoid them.
❌ Mistake 1: Not Excluding Brand Traffic
Many ecommerce stores don’t realize their Performance Max campaigns are spending heavily on their own brand name searches—traffic they would likely get organically or through much cheaper branded Search campaigns.
The problem: Performance Max competes with your own branded Search campaigns and often wins because it can bid higher. You’re essentially bidding against yourself and paying premium CPCs for traffic you’d get anyway.
The solution: Add your brand name and product brand names as negative keywords at the account level or campaign level. This prevents Performance Max from showing for branded searches, leaving that traffic to your dedicated (and cheaper) brand campaigns.
Go to your account settings, find Negative Keywords, and add:
- Your brand name
- Common misspellings of your brand
- Your brand name combined with product categories
- Specific product names if you have branded products
This simple fix often improves overall account ROAS by 20-30% by eliminating expensive duplicate traffic.
❌ Mistake 2: Setting Unrealistic ROAS Targets Too Early
Ambitious ecommerce owners often set Target ROAS at 800% or 1000% from day one, hoping to maximize profitability. The result? Campaigns barely spend and never exit learning phase.
The problem: Unrealistic ROAS targets severely restrict the algorithm’s ability to spend. If you demand 800% ROAS but market conditions only support 400%, the campaign can’t find enough conversion opportunities and stalls.
The solution: Start with Maximize Conversion Value for 2-3 weeks without any ROAS target. Let the algorithm explore and establish baseline performance. Once you see consistent conversions, implement Target ROAS at 20% below your actual achieved ROAS.
For example, if you’re naturally achieving 450% ROAS, set your target at 350-400%. This gives the algorithm room to spend and learn while still maintaining profitability. Gradually increase your target over weeks as performance stabilizes.
❌ Mistake 3: Constantly Changing Campaign Settings
Impatient marketers make changes every 2-3 days when they don’t see immediate results. Adjusting bids Monday, adding new asset groups Wednesday, changing location targeting Friday. This constant tinkering prevents the AI from learning effectively.
The problem: Every significant change resets Performance Max’s learning phase. The algorithm needs stable conditions to identify patterns and optimize. Constant changes mean perpetual learning phase and poor performance.
The solution: Make changes on a disciplined schedule:
- Daily: Monitor performance for major issues only (disapprovals, tracking errors)
- Weekly: Review key metrics, add negative keywords if needed
- Bi-weekly: Replace poorly performing assets
- Monthly: Evaluate bid strategy changes, budget adjustments, campaign restructuring
Give each change 7-14 days to show impact before making additional changes. Performance Max rewards patience and discipline.
❌ Mistake 4: Ignoring Product Feed Quality
Some ecommerce businesses set up Performance Max, see it’s pulling from Merchant Center, and forget about feed optimization. They focus on bidding and budget while their product titles are generic, images are low quality, and key attributes are missing.
The problem: Poor feed quality limits how effectively the algorithm can match products to searches and how appealing products appear to customers. No amount of smart bidding fixes bad product data.
The solution: Treat feed optimization as an ongoing process, not a one-time setup:
Monthly feed audits:
- Review product titles for completeness and keyword optimization
- Check that all products have high-quality images
- Verify pricing is competitive using Merchant Center benchmarks
- Ensure availability is accurate (no out-of-stock products showing)
- Confirm all required attributes are filled
Quarterly feed enhancements:
- Expand product descriptions with more detail
- Add additional images showing products from new angles
- Implement or refine custom labels for better campaign segmentation
- Test title variations for different product categories
Feed quality directly impacts Performance Max results. Invest time here for compound returns.
❌ Mistake 5: Not Segmenting by Profitability
Many stores run one Performance Max campaign covering their entire catalog—high-margin products, low-margin products, clearance items, and new launches all together with the same ROAS target.
The problem: Different products have different economics. High-margin products can support higher customer acquisition costs. Low-margin products need tighter cost controls. Treating everything the same leaves money on the table or wastes budget on unprofitable products.
The solution: Segment campaigns by margin and optimization goals using custom labels:
Campaign 1: High-Margin Products (>40% margin)
- Target ROAS: 300% (aggressive to capture volume)
- Budget: 40% of total PMax budget
- Goal: Maximize revenue from most profitable products
Campaign 2: Core Products (20-40% margin)
- Target ROAS: 400%
- Budget: 50% of total PMax budget
- Goal: Balanced growth maintaining profitability
Campaign 3: Volume Products (<20% margin)
- Target ROAS: 600% (conservative to ensure profitability)
- Budget: 10% of total PMax budget
- Goal: Supplemental revenue without sacrificing margins
This segmentation allows appropriate optimization for each product group’s economics.
Taking Action: Your Performance Max Implementation Plan
You now have a comprehensive understanding of how Performance Max works for ecommerce and the strategies that drive profitable results. Here’s your step-by-step implementation plan.
Week 1: Preparation
- Audit your Google Merchant Center feed for quality issues
- Optimize product titles using the strategies outlined
- Gather high-quality images and create videos if possible
- Verify conversion tracking is accurate and complete
- Define your campaign structure based on product margins and categories
Week 2: Campaign Setup
- Create your first Performance Max campaign with appropriate goal and bidding
- Connect your product feed using custom labels for segmentation
- Build asset groups with quality headlines, descriptions, and images
- Set up audience signals based on your best customer data
- Launch with Maximize Conversion Value to establish baseline
Week 3-4: Initial Optimization
- Monitor performance daily but avoid making changes
- Let the campaign complete its learning phase
- Review asset performance ratings
- Check that conversions are tracking correctly
- Document baseline ROAS and CPA
Week 5-6: Strategic Adjustments
- Replace poorly performing assets based on Google’s ratings
- Implement Target ROAS based on your achieved baseline
- Add negative keywords for brand exclusions
- Adjust budget based on early results
Week 7+: Ongoing Optimization
- Weekly monitoring of key metrics and performance trends
- Bi-weekly asset updates replacing lowest performers
- Monthly feed quality audits and enhancements
- Quarterly creative refreshes and campaign structure review
Scaling Timeline:
- Month 1-2: Prove profitability with initial budget
- Month 3-4: Scale budget by 20% weekly if maintaining target ROAS
- Month 5-6: Segment into multiple campaigns by margin/category
- Month 6+: Consider advanced strategies like new customer acquisition goals
Remember, Performance Max rewards patience and discipline. The brands seeing the best results treat it as a strategic channel requiring ongoing attention, not a “set and forget” automation tool.
Get Expert Help With Performance Max
At Digital Dawn, we specialize in Performance Max campaign setup and optimization for Indian ecommerce brands. Our team has managed Performance Max campaigns across industries from fashion and electronics to home goods and specialty products.
Our Performance Max services include:
✓ Complete campaign setup with optimized structure
✓ Product feed audit and optimization for maximum visibility
✓ Asset group creation with professional copywriting guidance
✓ Advanced audience signal strategy implementation
✓ Ongoing optimization and performance monitoring
✓ Monthly reporting with actionable insights
We don’t just set up campaigns—we actively manage and optimize them to deliver profitable growth, not just sales volume.
Our broader expertise:
Beyond Performance Max, our performance marketing services cover the complete paid advertising ecosystem including Meta Ads, Display campaigns, and Marketplace advertising. Our ecommerce solutions help online stores grow across all channels with integrated strategies that drive sustainable business growth.
Schedule a Free Performance Max Strategy Session →
We’ll audit your current advertising setup, analyze your product catalog potential, identify optimization opportunities in your feeds and campaigns, and create a customized Performance Max roadmap aligned with your revenue and profitability goals.
This comprehensive guide was created by Digital Dawn, a performance marketing and ecommerce agency based in Indore. We specialize in Google Ads management, Performance Max optimization, and ecommerce growth strategies for Indian online stores. Our hands-on experience managing campaigns across diverse product categories gives us practical insights into what actually works in India’s competitive ecommerce landscape. We believe in transparent knowledge sharing because educated clients make better partners, which is why we create detailed guides like this to help Indian ecommerce businesses succeed with performance marketing.